Hosting a blog
During the COVID19 pandemic-induced increased amounts of free time, I decided it would be a good idea to create a blog to keep a record of things I experiment with over time so they I can remember them in the future.
Research
First thing I did was do some research into which blogging platforms are out there and what makes more sense for me. Some of the most populars in the software developer world are:
- Medium: is a widely popular blogging platform where authors are paid based on how many readers they get. It is one of the easier platforms to get started with.
- Wordpres: is one of the most popular blogging platforms. It has been around for a while and you don’t need much programming knowledge to be proficient on it.
- Ghost: is similar to Wordpress but sleeker. It is newer than Wordpress and based in node.js.
- Github Pages: provides a way to expose a static website through a git repository hosted in Github. It integrates with Jekyll to provide markdown-based static websites.
While all the options are excellent I ended up deciding between Medium and Github pages due to their simplicity (and both being free). I ended up choosing Github Pages because it is a bit more customizable and because there is something very satisfying about having your website being a git repo.
Starting the Github Pages Blog
The documentation for Github Pages has good instructions for creating a site. The steps are basically:
-
Create a repo in github named
$YOUR_USERNAME.github.io, this is because github will host your site at that address since your github username is unique. -
Add a markdown file called
index.mdto the repository with the content you want to show on your site:
# Hello World!

Welcome to my github pages site!
- Push it into master and then go to
$YOUR_USERNAME.github.ioand you have a site setup!
Using Jekyll for better experience
On the previous step we were able to setup a very simple static site, but it is missing a few of the bells and whistles that other blogging platforms had. For example we want to provide RSS feeds for loyal readers, have customizable templating and perhaps Google Analytics support.
Github Pages support Jekyll as a way of managing your static website. It supports templating and custom plugins which makes it very customizable. Installation is very simple following these steps:
# Install Ruby gems for jekyll and bundle (jekyll 3.8.5 is used as version
# since that one is the latest one supported by Github).
gem install jekyll -v 3.8.5
gem install bundler

# Create a new Jekyll repository.
cd my_repo_dir
jekyll _3.8.5_ new .

# Run a local webserver to iterate over your blog quickly. You should read the
# instructions laid there by the initial Jekyll server
bundle exec jekyll serve
Custom domain
Now that we are all setup, there is one thing missing. I want users to access my blog throgh a custom domain so that I’m not tied to github forever in case I decide to switch hosting providers.
Luckly Github Pages provides an easy way to do this. I own a domain bought through Google Domains so I will be doing most of the work through there. Here are the list of steps I followed:
-
Add a CNAME DNS record that points from the subdomain
blogto$YOUR_USERNAME.github.io. CNAME stands for Canonical Name Record, these records allow you to provide an alias for a domain. In this case we want our custom domain to be an alias for the$YOUR_USERNAME.github.iopage. -
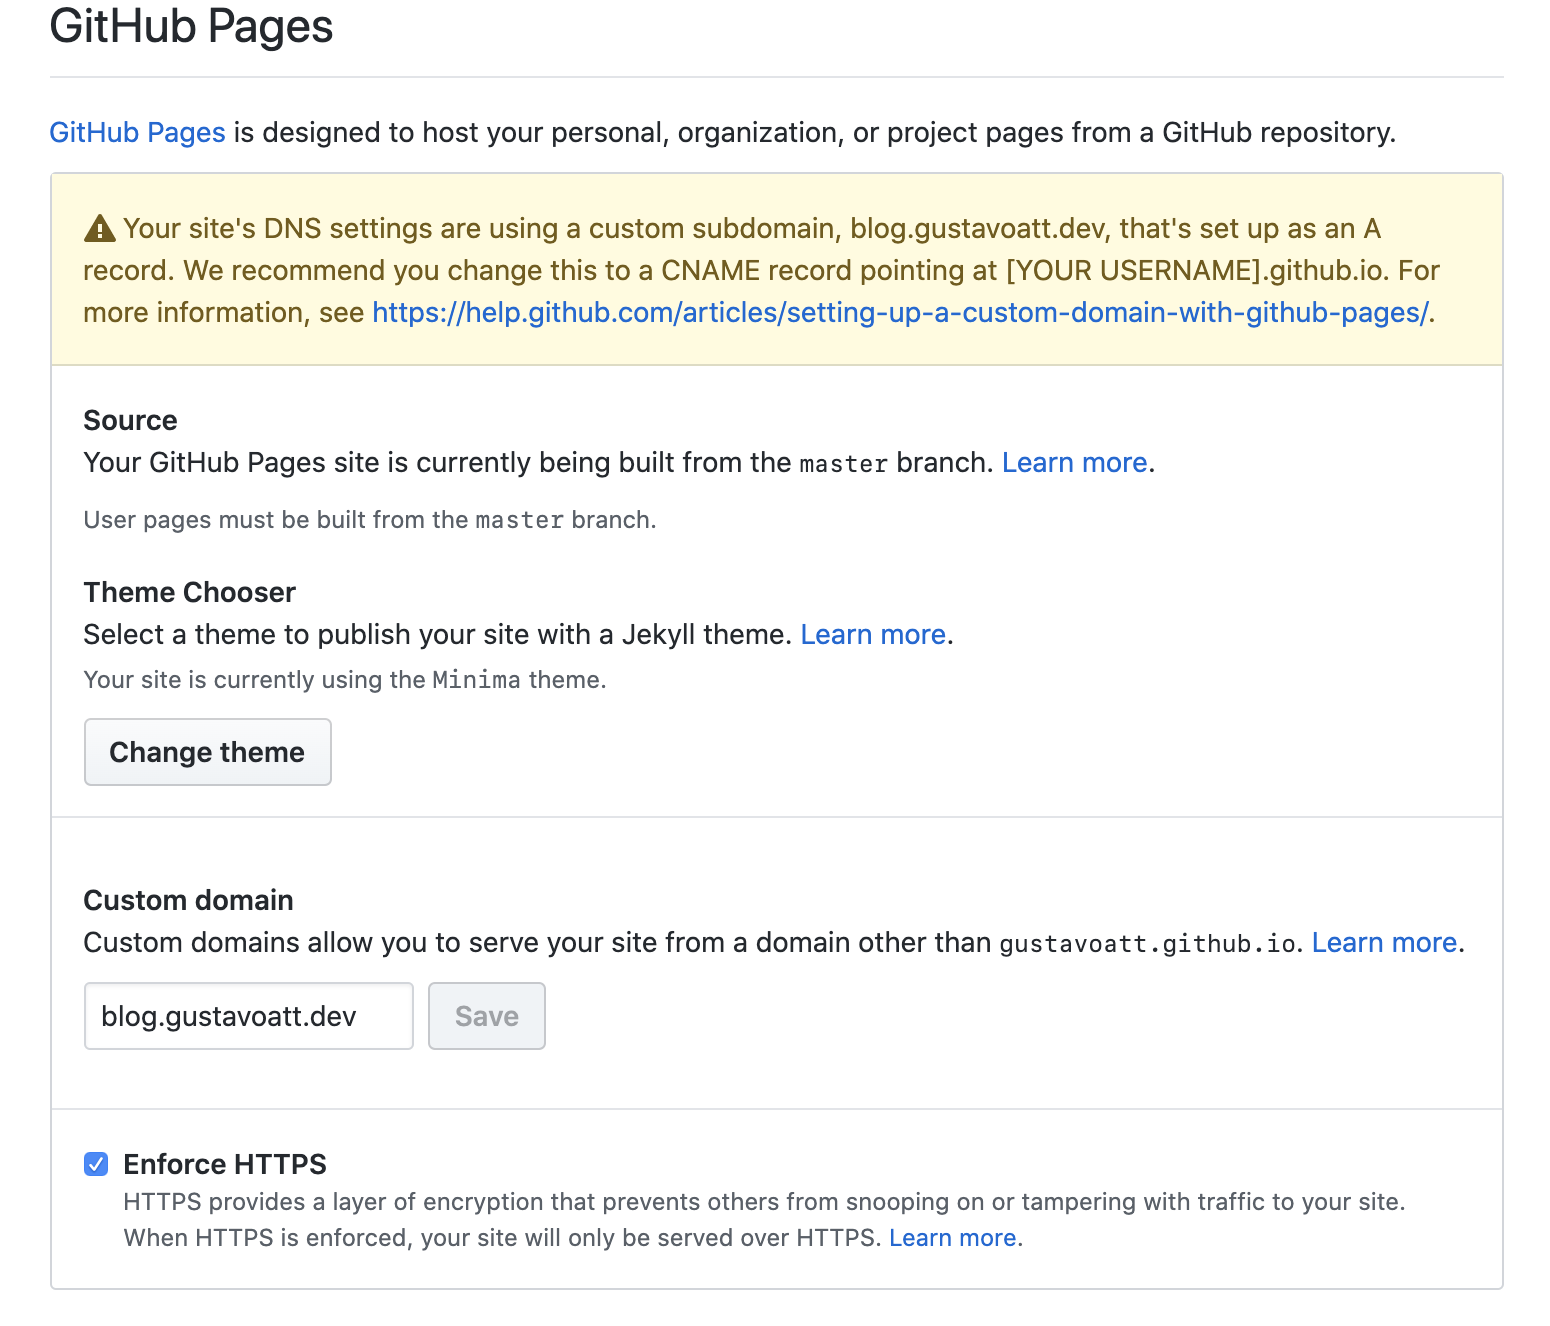
Go to your Github repo settings, and, under options, go to the Github Pages section and set your custom domain name. Make sure you enable https since to make sure that traffic between our blog and our users is not compromised. See the screenshot below for that.
After waiting a few minutes you should be able to access your website on your custom domain.
Analytics
As a last step I wanted to add Google Analytics tracking to the blog so that I know how often my site is visited and which posts are more popular.
First we need to create a new property in Google Analytics so that we have a new
tracking ID (and script) that we can add to our website <head> HTML tag.
After we have our UA-NNNNNNNN-N tracking ID, we need to tell Jekyll how to use.
Depending on your theme there are different ways to set this up. For the default
Jekyll theme minima you would only need to
set this property in _config.yml:
google_analytics: UA-NNNNNNNN-N
By default Jekyll will only set this in the production environment (set by Github Pages for you).
Final Thoughts
In this post I show you how to host a simple yet highly customizable blog using github pages on a custom domain while simple tracking capabilities to monitor the popularity of your blog.